Showing posts with label spring-integration. Show all posts

Wednesday, June 17, 2015

Using Spring Integration for creating scalable distributed services backed by JMS (part 2)

In part 1 of this series, we explored how Spring Integration allows us to easily leverage some of the Enterprise Integration Patterns to deploy salable services. In this part we'll take a look at one more pattern that is very helpful, the claim check pattern. This patterns allows to store parts of message, to be retrieved at a later stage.  This is illustrated on the following diagram:

In practice, this pattern allows us to avoid having to send very large messages across the JMS broker. Message brokers are designed to handle many small messages, and performance tends to degrade with larger messages. While there are ways of tweaking the different JMS brokers to work better in these kinds of workloads, the "Claim Check" pattern allows us to sidestep the issue entirely, by using a separate storage mechanism to hold parts of our messages. So how big is too big for a message? That's a very subjective matter, but good common sense will tell us that for example most large binary data should not be transferred through a JMS broker.
Luckily Spring Integration provides out of the box support for this pattern.  In fact, we can use the pattern without making any changes to our code. We do require some extra libraries, which we have added to the pom.xml file:
<dependency>
    <groupId>org.springframework.integration</groupId>
    <artifactId>spring-integration-jdbc</artifactId>
    <version>${spring.version}</version>
</dependency>

<dependency>
    <groupId>com.h2database</groupId>
    <artifactId>h2</artifactId>
    <version>1.4.187</version>
</dependency>

<dependency>
    <groupId>commons-dbcp</groupId>
    <artifactId>commons-dbcp</artifactId>
    <version>1.4</version>
</dependency>
We have added:

  1. The Spring Integration JDBC jar. This provides, among other functionality, a JDBC backed message store.
  2. H2, a Java embedded database. In this database we will store our messages.
  3. Apache Commons DBCP, a connection pool to manage our JDBC connections.

Now let's look at the spring-int-server.xml file:
<?xml version="1.0" encoding="UTF-8"?>
<beans xmlns="http://www.springframework.org/schema/beans"
       xmlns:jdbc="http://www.springframework.org/schema/jdbc"
       xmlns:xsi="http://www.w3.org/2001/XMLSchema-instance"
       xmlns:int="http://www.springframework.org/schema/integration"
       xmlns:int-jms="http://www.springframework.org/schema/integration/jms"
       xmlns:int-jdbc="http://www.springframework.org/schema/integration/jdbc"
       xmlns:amq="http://activemq.apache.org/schema/core"
       xsi:schemaLocation="
   http://www.springframework.org/schema/beans
   http://www.springframework.org/schema/beans/spring-beans.xsd
   http://www.springframework.org/schema/jdbc
   http://www.springframework.org/schema/jdbc/spring-jdbc.xsd
   http://www.springframework.org/schema/integration
   http://www.springframework.org/schema/integration/spring-integration.xsd
   http://www.springframework.org/schema/integration/jms
   http://www.springframework.org/schema/integration/jms/spring-integration-jms.xsd
   http://www.springframework.org/schema/integration/jdbc
   http://www.springframework.org/schema/integration/jdbc/spring-integration-jdbc.xsd
   http://activemq.apache.org/schema/core
   http://activemq.apache.org/schema/core/activemq-core.xsd
  ">


    <amq:broker id="activeMQBroker" useJmx="false" persistent="false">
        <amq:transportConnectors>
        <amq:transportConnector uri="tcp://localhost:61616" />
        </amq:transportConnectors>
    </amq:broker>

    <bean id="h2DBServer" class="org.h2.tools.Server" <!-- 1 -->
          factory-method="createTcpServer" init-method="start" destroy-method="stop">
        <constructor-arg value="-tcp,-tcpAllowOthers,-tcpPort,8043" />
    </bean>


    <bean id="serverDataSource" class="org.apache.commons.dbcp.BasicDataSource" destroy-method="close"> <!-- 2 -->
        <property name="driverClassName" value="org.h2.Driver"/>
        <property name="url" value="jdbc:h2:tcp://localhost:8043/mem:test"/>
        <property name="username" value="sa"/>
        <property name="password" value=""/>
    </bean>

    <jdbc:initialize-database data-source="serverDataSource"> <!-- 3 -->
        <jdbc:script location="classpath:org/springframework/integration/jdbc/schema-h2.sql"/>
    </jdbc:initialize-database>

    <int-jdbc:message-store id="serverMessageStore" data-source="serverDataSource"/> <!-- 4 -->

    <bean id="orderServiceHandler" class="com.javaprocess.examples.integration.impl.OrderServiceHandler"/>

    <int:channel id="inChannel" />

    <int-jms:inbound-gateway request-channel="inChannel"
                             request-destination="amq.outbound"
                             concurrent-consumers="10"/>
    <int:chain  input-channel="inChannel"> <!-- 5 -->
        <int:service-activator ref="orderServiceHandler" method="processOrder"/>
        <int:claim-check-in message-store="serverMessageStore"/> <!-- 6 -->
    </int:chain>


</beans>
Now let's look at the changes:
  1. We have an in memory instance of an H2 database. H2 is a very useful embedded database, which means that we can run it inside of our JVM process. No need to have a separate database server for this example. Both the server and the client will connect to this instance. Obviously in production you will choose something more robust. But for this example, this setup works well. It's worth noting that the H2 is started with the configuration options needed to accept outside connections over TCP.
  2. A datasource is created. This datasource will point to the database server created in point #1.
  3. A data base initialization element. Spring Integration requires some tables to be created in the database that will be used as a message store. Since our database will reside in memory, this will be run every time the server is started up.
  4. The message store we're using is a JDBC store, using the data source defined in #2.
  5. We now introduce the chain element. The chain element allows multiple filter or transformations to be chained together. In this case we're still delegating to the orderServiceHandler bean for processing as the first step in the chain.
  6. In the second step of the chain, we check in the message. This transformed will take the message (which must be serializable ), store in the message store, and return a UUID (Universally Unique Identifier). This UUID is sent to the client.
Now let's look at the client side. The client side is very similar to server (actually a bit simpler).
<?xml version="1.0" encoding="UTF-8"?>
<beans xmlns="http://www.springframework.org/schema/beans"
       xmlns:xsi="http://www.w3.org/2001/XMLSchema-instance"
       xmlns:int="http://www.springframework.org/schema/integration"
       xmlns:int-jms="http://www.springframework.org/schema/integration/jms"
       xmlns:int-jdbc="http://www.springframework.org/schema/integration/jdbc"
       xsi:schemaLocation="
   http://www.springframework.org/schema/beans
   http://www.springframework.org/schema/beans/spring-beans.xsd
   http://www.springframework.org/schema/integration
   http://www.springframework.org/schema/integration/spring-integration.xsd
   http://www.springframework.org/schema/integration/jms
   http://www.springframework.org/schema/integration/jms/spring-integration-jms.xsd
   http://www.springframework.org/schema/integration/jdbc
   http://www.springframework.org/schema/integration/jdbc/spring-integration-jdbc.xsd
  ">

    <int:channel id="requestChannel"/>

    <bean id="clientDataSource" class="org.apache.commons.dbcp.BasicDataSource" destroy-method="close"> <!-- 1 -->
        <property name="driverClassName" value="org.h2.Driver"/>
        <property name="url" value="jdbc:h2:tcp://localhost:8043/mem:test"/>
        <property name="username" value="sa"/>
        <property name="password" value=""/>
    </bean>

    <int-jdbc:message-store id="clientMessageStore" data-source="clientDataSource" /> <!-- 2 -->

    <int:gateway id="orderService"
                 service-interface="com.javaprocess.examples.integration.interfaces.IOrderService"
                 default-request-channel="requestChannel"/>
    <int:chain input-channel="requestChannel"> <!-- 3 -->
        <int-jms:outbound-gateway request-destination="amq.outbound" extract-request-payload="true"/>
        <int:claim-check-out message-store="clientMessageStore"/>
    </int:chain>


    <bean id="app" class="com.javaprocess.examples.integration.impl.App">
        <property name="orderService" ref="orderService"/>
    </bean>

</beans>
Let's look at the changes in this file:

  1. A data source is created, using the same URL as in the server side. There's no need to start up the H2 server here, since we're using the H2 running inside the server process.
  2. A message store is created using the data source created in #1.
  3. A chain is created to handle messages in the "requestChannel". This chain will receive a UUID, and retrieve the corresponding object from the message store.
To check out the code clone the following repository: https://github.com/aolarte/spring-integration-samples.git.
git clone https://github.com/aolarte/spring-integration-samples.git
git checkout branches/part2
Once you checkout the code, you can run the server and client process using Maven (in different terminals):
mvn exec:java -Dexec.mainClass="com.javaprocess.examples.integration.main.Main" -Dexec.args="server"

mvn exec:java -Dexec.mainClass="com.javaprocess.examples.integration.main.Main" -Dexec.args="client"

You will see the exact same output as in part 1. While that might seem anti-climatic, the important aspect is what is happening behind the scenes. The message is being stored in a database, and a UUID is sent across the wire.  What we have implemented is a very simple Enterprise Service Bus.  There's plenty of opportunities to use patterns like this. On the next article we will elaborate on some of these opportunities.

Tuesday, May 19, 2015

Using Spring Integration for creating scalable distributed services backed by JMS (part 1)

Spring Integration provides an implementation of the Enterprise Integration Patterns (as described in the book "Enterprise Integration Patterns: Designing, Building, and Deploying Messaging Solutions" by Gregor Hohpe and Bobby Woolf). While these patterns are mostly designed to integrate separate heterogeneous systems, Spring Integration allows you to use these patterns inside of your application. One useful mechanism provided by Spring Integration is an implementation of the "Request-Reply" pattern. In this pattern a command message is sent with a "ReplyTo" address. Using the "ReplyTo" address, the replier entity knows where to send the response.  This pattern is illustrated in the following diagram:


The plumbing to achieve this is somewhat complicated an tedious, however Spring Integration takes care of all of the boilerplate code, with just a few lines of XML. This provides a very powerful mechanism, where you can define your interface and use it, without any knowledge of the mechanism used to communicate with the actual implementation. Furthermore, you can change this mechanism as needed, just by changing your configuration.
In this post we're going to wire a service using a direct connection. The direct connection occurs inside the JVM, in the same thread, resulting in very little overhead. We're also going to configure that same service using a JMS queue. Using this transport mechanism, the Requestor and the Replier and decoupled, and can live in different JVMs, potentially hosted in different machines. This also allows you to scale, by adding more Replier machines, to increase the capacity.

Using Spring Integration to wire a service

In this first part, we're going to create a an Interface for a service. The implementation of this interface is not wired directly, but rather provided by Spring Integration, using the configuration provided in the spring XML. The Interface is very basic as you can see below. When using Spring Integration it's best to design simple Interfaces, with few, coarse grained methods.

package com.javaprocess.examples.integration.interfaces;

import com.javaprocess.examples.integration.pojos.Order;
import com.javaprocess.examples.integration.pojos.OrderConfirmation;

public interface IOrderService {
    OrderConfirmation placeOrder(Order order);
}
This interface is going to be backed by the following class:
package com.javaprocess.examples.integration.impl;

import com.javaprocess.examples.integration.pojos.Order;
import com.javaprocess.examples.integration.pojos.OrderConfirmation;

public class OrderServiceHandler {


        public OrderConfirmation processOrder(Order order) {
            long threadId = Thread.currentThread().getId();
            System.out.println("Got order with id " + order.getId() + " on thread: " + threadId);
            OrderConfirmation ret = new OrderConfirmation();

            ret.setThreadHandler(threadId);
            return ret;
        }
}
You might notice that OrderServiceHandler does not implement IOrderService, and in fact, the methods names do not even match. So how can we have such level of decoupling? This is where Spring Integration comes into the picture:
<?xml version="1.0" encoding="UTF-8"?>
<beans xmlns="http://www.springframework.org/schema/beans"
       xmlns:xsi="http://www.w3.org/2001/XMLSchema-instance"
       xmlns:int="http://www.springframework.org/schema/integration"
       xsi:schemaLocation="
   http://www.springframework.org/schema/beans
   http://www.springframework.org/schema/beans/spring-beans.xsd
   http://www.springframework.org/schema/integration
   http://www.springframework.org/schema/integration/spring-integration.xsd
  ">
    
    <bean id="orderServiceHandler" class="com.javaprocess.examples.integration.impl.OrderServiceHandler"/> <!-- 1 -->

    <int:channel id="requestChannel"/> <!-- 2 -->

    <int:service-activator input-channel="requestChannel"
    ref="orderServiceHandler" method="processOrder" /> <!-- 3 -->

    <int:gateway id="orderService"
                 service-interface="com.javaprocess.examples.integration.interfaces.IOrderService"  <!-- 4 -->
                 default-request-channel="requestChannel"/> <!-- 5 -->

    <bean id="app" class="com.javaprocess.examples.integration.impl.App">
        <property name="orderService" ref="orderService"/> <!-- 6 -->
    </bean>
    
</beans>
Let's look at the relevant part of this Spring xml configuration (spring-int.xml):

  1. We instantiate an OrderServiceHandler bean. This will execute our business logic. How you instantiate it is your choice, we declare it manually in this example for clarity.
  2. We declare a Spring Integration channel "requestChannel". This channel will send the reply back to the requestor.
  3. The Service Activator is an endpoint, which connects a channel to Spring Bean. In this case we're connecting requestChannel channel to our business logic bean.  In this xml block we also declare that the "processOrder" method will invoked for this Service Activator.
  4. The Gateway is another endpoint point, designed to expose a simple interface, while hiding all of the Spring Integration complexity. In this case we're wiring our two channels, and exposing the gateway as "orderService" implementing the IOrderService interface. This is the basic syntax for an interface with a single method, the xml get more complicated with additional methods as every method must be wired independently.
  5. We're using "requestChannel" to send out requests.
  6. The "app" bean is our test application. 
We explicitly specified a channel to send the request ("requestChannel"). So how does the JMS outgoing-gateway know where to send the reply? By default it sends it back to the requester, using a temporary anonymous channel, so Spring Integration gives us that functionality for free. If you have special needs, to can specify the reply channel. We'll explore this in future postings. 
The code for the App is shown below, and it creates 5 threads, processing an order in each thread, using the IOrderService bean provided by Spring Integration (Remember, we have no implementation of IOrderService anywhere in our source code):
package com.javaprocess.examples.integration.impl;

import com.javaprocess.examples.integration.pojos.Order;
import com.javaprocess.examples.integration.pojos.OrderConfirmation;
import com.javaprocess.examples.integration.interfaces.IOrderService;

import java.util.ArrayList;
import java.util.List;

public class App {

    public class AppWorker implements Runnable {
        public void run() {
            long threadId=Thread.currentThread().getId();
            System.out.println("Requesting order processing on thread: " + threadId);
            Order order=new Order();
            order.setId(100);
            OrderConfirmation ret= orderService.placeOrder(order);
            System.out.println("Order was requested by " + threadId+"  and by processed by thread: " + ret.getThreadHandler());
        }
    }

    private IOrderService orderService;

    public void setOrderService(IOrderService orderService) {
        this.orderService = orderService;
    }

    public void run() {
        List list=new ArrayList();
        for (int i=0;i<5 appworker="" catch="" e.printstacktrace="" e="" for="" hread="" i="" list.add="" new="" nterruptedexception="" pre="" thread.join="" thread.start="" thread:list="" thread="" try="">
The example is provided as a Maven application, and can be compiled command:
mvn compile
Once compiled, you can see it in action:
mvn exec:java -Dexec.mainClass="com.javaprocess.examples.integration.main.Main" -Dexec.args="direct"
The argument "direct" will cause the main method to use the Spring configuration we were examining before. The output will look something like this:
Running in client mode
Requesting order processing on thread: 13
Requesting order processing on thread: 14
Requesting order processing on thread: 15
Requesting order processing on thread: 16
Requesting order processing on thread: 17
Got order with id 100 on thread: 16
Got order with id 100 on thread: 15
Got order with id 100 on thread: 17
Got order with id 100 on thread: 13
Got order with id 100 on thread: 14
Order was requested by 16  and by processed by thread: 16
Order was requested by 15  and by processed by thread: 15
Order was requested by 14  and by processed by thread: 14
Order was requested by 17  and by processed by thread: 17
Order was requested by 13  and by processed by thread: 13
So what is happening in this example?

  • Spring Integration has created a dynamic proxy that implements IOrderService.  This proxy is exposed as Spring Bean with name "orderService".  This is the bean is used from inside App.
  • The "placeOrder" method in "orderService" is connected using two channels to a method ("processOrder") in the "orderServiceHandler" bean.
  • The processing of the order is occurring in the same thread in which it is requested.
This can be seen in the following diagram:
Service connected directly using Spring Integration


Up to this point, Spring Integration seems to add very little value, and a lot of extra XML configuration. The same result could have been achieved by having OrderServiceHandler implement IOrderService and wiring the bean directly (even easier if using annotations). However the real power of Spring Integration will become evident on the next section.

Using JMS with Spring Integration

In this next section we're going to have two separate Spring configuration, one for the Requestor, and one for the Replier. They exist in two different files, and we can run them in the same JVM, or in separate JVMs.
First we will examine the file for requestor (spring-int-client.xml):
<?xml version="1.0" encoding="UTF-8"?>
<beans xmlns="http://www.springframework.org/schema/beans"
       xmlns:xsi="http://www.w3.org/2001/XMLSchema-instance"
       xmlns:int="http://www.springframework.org/schema/integration"
       xmlns:int-jms="http://www.springframework.org/schema/integration/jms"
       xsi:schemaLocation="
   http://www.springframework.org/schema/beans
   http://www.springframework.org/schema/beans/spring-beans.xsd
   http://www.springframework.org/schema/integration
   http://www.springframework.org/schema/integration/spring-integration.xsd
   http://www.springframework.org/schema/integration/jms
   http://www.springframework.org/schema/integration/jms/spring-integration-jms.xsd
  ">

    <int:channel id="outChannel"></int:channel> <!-- 1 -->

    <int:gateway id="orderService"
                 service-interface="com.javaprocess.examples.integration.interfaces.IOrderService"
                 default-request-channel="outChannel"/> <!-- 2 -->

    <int-jms:outbound-gateway request-channel="outChannel"
                              request-destination="amq.outbound" extract-request-payload="true"/> <!-- 3 -->

    <bean id="app" class="com.javaprocess.examples.integration.impl.App">
        <property name="orderService" ref="orderService"/> <!-- 4 -->
    </bean>

</beans>

  1. The outgoing channel is declared. This channel is used by the gateway to send its requests.
  2. The gateway is setup in a similar fashion as in the first example. You might have noticed that it lacks a setting for "default-reply-channel", this is on purpose, and will be explained shortly.
  3. The JMS outgoing gateway (notice we're using the int-jms namespace). This is the interface with the JMS broker, it will read messages from "outChannel" and send them to the "amq.outbound" JMS queue.
  4. The app is the same as used in the first example. This way we show how you wire services differently, without rewriting any code.
The counter part to requestor, is the replier (spring-int-server.xml). The file is shown below:
<?xml version="1.0" encoding="UTF-8"?>
<beans xmlns="http://www.springframework.org/schema/beans"
       xmlns:xsi="http://www.w3.org/2001/XMLSchema-instance"
       xmlns:int="http://www.springframework.org/schema/integration"
       xmlns:int-jms="http://www.springframework.org/schema/integration/jms"
       xmlns:amq="http://activemq.apache.org/schema/core"
       xsi:schemaLocation="
   http://www.springframework.org/schema/beans
   http://www.springframework.org/schema/beans/spring-beans.xsd
   http://www.springframework.org/schema/integration
   http://www.springframework.org/schema/integration/spring-integration.xsd
   http://www.springframework.org/schema/integration/jms
   http://www.springframework.org/schema/integration/jms/spring-integration-jms.xsd
   http://activemq.apache.org/schema/core
   http://activemq.apache.org/schema/core/activemq-core.xsd
  ">

    <amq:broker id="activeMQBroker" useJmx="false" persistent="false">
        <amq:transportConnectors>
        <amq:transportConnector uri="tcp://localhost:61616" />
        </amq:transportConnectors>
    </amq:broker> <!-- 1 -->

    <bean id="orderServiceHandler" class="com.javaprocess.examples.integration.impl.OrderServiceHandler"/> <!-- 2 -->

    <int:channel id="inChannel" /> <!-- 3 -->

    <int-jms:inbound-gateway request-channel="inChannel" request-destination="amq.outbound"
                             concurrent-consumers="10"/> <!-- 4 -->

    <int:service-activator input-channel="inChannel"
                           ref="orderServiceHandler" method="processOrder"/> <!-- 5 -->

</beans>
  1. A broker is configured to run in-process, on the JVM hosting the replier or server component. This is suitable for a proof of concept such as this. In production you will want to run a stand alone and properly tuned Broker.
  2. This channel will be used to send messages received from JMS, to the service activator
  3. A JMS inbound gateway will read messages from the Queue. Of special interest in here is the number of concurrent consumers. This can be tweaked to set the number of threads that will process incoming messages.
  4. The service activator is configured to listen on the "inChannel". Similar to the way we defined Gateway, we have omitted the output-channel parameter.

You can run both the requestor and the replier in the same JVM, by using this command:
mvn exec:java -Dexec.mainClass="com.javaprocess.examples.integration.main.Main" -Dexec.args="client server"
Running in this fashion will result in an input similar to this:
Running in client mode
Requesting order processing on thread: 33
Requesting order processing on thread: 34
Requesting order processing on thread: 35
Requesting order processing on thread: 36
Requesting order processing on thread: 37
Got order with id 100 on thread: 19
Got order with id 100 on thread: 24
Got order with id 100 on thread: 26
Got order with id 100 on thread: 18
Got order with id 100 on thread: 25
Order was requested by 37  and by processed by thread: 26
Order was requested by 36  and by processed by thread: 18
Order was requested by 34  and by processed by thread: 25
Order was requested by 33  and by processed by thread: 19
Order was requested by 35  and by processed by thread: 24
Closing context
Notice how the the thread that made the request is different from the thread the replied to the request.
We can take this a step further and see it run in two different JVMs. First start the server. This is necessary since it also starts the JMS broker that the client will connect to. Invoked in this fashion, the server will run until manually terminated, fulfilling any requests put in the queue.
mvn exec:java -Dexec.mainClass="com.javaprocess.examples.integration.main.Main" -Dexec.args="server"
Once the server has started, open a new terminal or command prompt window, and start the client:
mvn exec:java -Dexec.mainClass="com.javaprocess.examples.integration.main.Main" -Dexec.args="client"
You will see the client making requests:
Running in client mode
Requesting order processing on thread: 13
Requesting order processing on thread: 14
Requesting order processing on thread: 15
Requesting order processing on thread: 16
Requesting order processing on thread: 17
Order was requested by 15  and by processed by thread: 21
Order was requested by 16  and by processed by thread: 24
Order was requested by 14  and by processed by thread: 20
Order was requested by 13  and by processed by thread: 17
Order was requested by 17  and by processed by thread: 19
Closing context
You will also see the server fulfilling these requests:
Running in server mode
Got order with id 100 on thread: 19
Got order with id 100 on thread: 17
Got order with id 100 on thread: 20
Got order with id 100 on thread: 24
Got order with id 100 on thread: 21
If you start more than one client working at a time, you will see the server replying to all the incoming requests.

So how is this working?

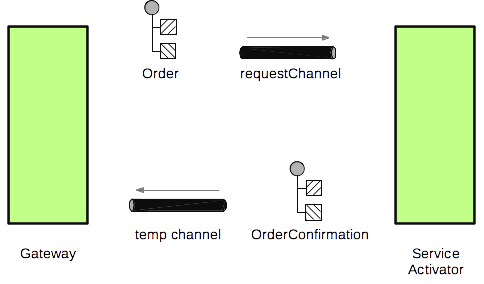
On the other hand we define a JMS Queue as the destination to send the request, but how does the replier know which channel to use to send the respond? The outgoing-gateway will create a temporary channel, and sets "ReplyTo" JMS header to this temporary channel. This can conceptualized in the following diagram:
JMS backed service

Conclusion

So why should you try to use something like this? We'll point out some general advantages, but as usual, remember that the best solution depends on your particular needs.

  • This approach provides a deep decoupling, allowing you to have servers in the back servicing requests. These servers can be even added on demand.
  • The scalability of Messaging based service buses tends to be better than other approaches like load balances, specially under heavy load. If using a load balancer, a single request that takes too long could cause a server to drop off the load balancer. With messaging, the available servers will continue to service requests as fast as possible.
  • Spring Integration provides a great deal of extra functionality out of the box, such as the "Claim Check" pattern. We'll examine some of these possibilities in future posts.  Other remoting frameworks (such as plain Spring remoting) do not provide this wealth of extra functionality.
  • This approach provides a huge deal of flexibility. Can even wire different methods in single interface using different transports (JMS, direct connection, REST web services).
  • The configuration can be easily changed by modifying the XML files. These files can even be located in files outside of the application. This allows precise tuning, without having to change the application code, recompile, or repackage. In this respect, I favor using the XML configuration as opposed to Java configuration.

Source code

You can find the source code for this example in github
To check out the code clone the following repository: https://github.com/aolarte/spring-integration-samples.git.
git clone https://github.com/aolarte/spring-integration-samples.git
git checkout branches/part1