Saturday, March 14, 2015

My Study notes for Oracle WebLogic Server 12c: Advanced Administrator II (1z0-134)

I recently took the "Oracle WebLogic Server 12c: Advanced Administrator II".  I actually took the beta exam (1z1-134).  This is the exam that will eventually become 1z0-134.  I wanted to share some of my experience.  You will also find my notes down below. As a took, the beta exam, some of the questions I encountered on the test will not on the final production test, so take my advice with that caveat.
I assume that if you're reading this, you have already achieved the Weblogic OCA level certification, and therefore have basic knowledge.

  • Practice (a lot of) scripting For this test, practicing on a real Weblogic instance is a must.  Practice doing routine (and not so routine tasks) using WLST.  Things like monitoring running services, online and offline editing, deploying applications, creating some of the more esoteric Weblogic components. There are plenty of questions regarding scripting.
  • Learn your JMS Besides knowing how to setup the different JMS components in Weblogic, review some of the JMS internals, like persistence, acknowledgments, durable subscribers, etc. Review how these different operation methods are reflected in JMS headers. There's a significant focus on JMS. I found this post useful regarding JMS tuning.
  • The NodeManager and service migration There's plenty of questions on different scenarios and the interaction between the NodeManager and migration. I feel that this section requires plenty of work, since most people will only be exposed to only a few of these scenarios in their day to day work.
    • Service vs. whole server migration
    • Script vs. Java NodeManager
    • Consensus vs. Database leasing
  • WLDF For me, WLDF (Weblogic Diagnostic Framework), was a fairly weak area.  Make sure you play around with all of the pieces of the framework.
  • Coherence Coherence was another weak area for me, having never had practical experience with it.  However, the questions related to Coherence we fairly basic. If you need to get started, this post helped me a lot.
  • Linux I was surprised to find some basic linux questions.  I would say they were fairly strait forward, and anyone who had done some day to day troubleshooting will have no problem with them.  If you have only worked under Windows, some research will come in handy.
Below you will find my notes.  Most of my notes come the Weblogic documentation found here.

You can access my notes directly by using this link.

Now the wait is on for the beta period to finish, and to see how well I did. Regardless, this proved to be a very insightful experience, in which I was able to fill quite a few weak areas in my Weblogic knowledge.

Sunday, March 1, 2015

Stepping through the internal code of your JavaEE application server in IntelliJ IDEA

While while trying to container based authentication working with a JDBC realm, I had the need to step through the internals of GlassFish to get a better idea why my settings were not working. It seems that by default IntelliJ IDEA does not provide access to the class path of the application server.


To be able to step through the code, I had to follow a few steps:


1 - Increase the logging in GlassFish.  This is optional, but it gave me an idea of where to start looking for the issue.
2 - Download the GlassFish source code.  This is not an issue for an open source app server.  If you don't have access to the source of your particular proprietary app server, IntelliJ IDEA will still allow you to step through it, and will try to decompile the code, with various level of sucess.
3 - Add the jar that contains the actual compiled byte code.  I found two ways of doing this for Maven based project, one using the provided scope, and another way using the system scope. This step is critical, and at least for me counter intuitive.

Add the jar to your pom.xml using the provided scope:
<dependency>
    <groupId>org.glassfish.main.extras</groupId>
    <artifactId>glassfish-embedded-all</artifactId>
    <version>4.1</version>
    <scope>provided</scope>
</dependency>

This is the easiest solution, but you might not be able to find the required jar in any maven repo.  If you don't find the right jar, but find any jar that has the class, you can use.  For this to work you will have to attach the right source code, as downloaded in step #2.  Otherwise, IntelliJ will decompile the class and give you a nonsensical java file that does not match what you are running.  


Add the jar to your pom.xml using the system scope:
<dependency>
    <groupId>org.glassfish</groupId>
    <artifactId>glassfish</artifactId>
    <version>4.1</version>
    <systemPath>h:/servers/glassfish/modules/security-ee.jar</systemPath>
    <scope>system</scope>
</dependency>

If you don't have source code, I recommend this approach.  This will give you a lot of information, even if you lack access to the source code.

5 - Add the source to your new library. The easiest way is to open the class that you want to examine or add the break point to.  Once open you will see the source as decompiled by IntelliJ IDEA. If possible add the sources you downloaded in step #2 to make your life a bit easier.  Select "Choose Sources..." and navigate to your source directory.

You now have access to the class you need. Drop a break point, add a watch, step through it as you need!

6 - Make sure you remove the dependency after your done.  You don't want to have extra dependencies, and in the worst case the build will fail in other computers, if the system scoped library is not available in the same location.

Saturday, September 13, 2014

Passing the Java EE 6 Enterprise Architect Certified Master Part 2 and 3 (1Z0-865 and 1Z0-866)

The "Plan"

I finally got my result for the assignment and essay tests for the Oracle Certified Master, Java EE 6 Enterprise Architect  (1Z0-865 and 1Z0-866).  I wanted to take this opportunity to share some of my experience on this endeavor.  If you want to read about part one of the certification, my notes are available here.

I downloaded my assignment on June 30th, and spent the next few days reading and re-reading the assignment.  I set myself a very aggressive (and overly optimistic) timeline to finish the assignment in 4 weeks.

Week 1

In week one I wanted to brush up on some UML, since this was weak area for me.  I used two books that were available in my local public library:
  • "Fast track UML 2.0" by Kendall Scott
  • "Learning UML 2.0" by Miles, Russ
I also wanted to prototype some aspects of the application.  Working with J2EE 6 is fast enough that a simple application can be created painlessly.  It was also a good opportunity to think how I would create a green field application under "perfect" circumstances, something that is rarely possible in the real world.  This prototype would also allow me to validate some of the architectural decisions.

Week 2

Continuing with the prototype, the idea was to test some of the more complicated aspects that would be required to complete the assignment.  Some of these technologies I was comfortable with, while others proved a learning experience:
  • Authentication (using JASPIC)
  • RMI
  • JSF

Week 3

The plan was to create all of the diagrams during the third week.  For the most part the plan was to follow the diagrams as shown in "Sun Certified Enterprise Architect for Java EE Study Guide" by Mark Cade and Humphrey Sheil.

For the UML diagrams I tried free different tools:

JDeveloper

Pros: Nice looking diagrams.  Very good Java round tripping. I was already somewhat familiar with this tool, since I had used it at work to create some basic diagrams.
Cons: Not suitable to create component and deployment diagrams.  A memory hog prone to crashing every so often.

StarUML

Pros: Simple to use.
Cons: UML 2.0 support was lacking.  Some people mentioned that diagrams could be 1.x UML compliant, but I wanted to focus on 2.0 diagrams.  The diagrams were not very aesthetic.

Visual Paradigm Community Edition

Pros: Nice looking diagrams and plenty to format
Cons: The Community Edition only support one diagram per type.  This only proved to be a problem in the sequence diagrams, in which I had to create one file per diagram.

I ended up using Visual Paradigm, which proved to be the most mature free UML tool I could find.

Week 4

In week for I was hoping to review everything, create the HTML, and write the top 3 risks, and all of the assumptions.

How everything went down

All in all, my four week plan took seven weeks.  While I was able to meet most of my objectives for the first three weeks (including a mostly complete prototype), I underestimated the time required to do the diagrams.  I had to familiarize with a new tool (Visual Paradigm), and learn parts of UML that I had never learned.  As other people around the net mention, the sequence diagrams take a lot of time to complete.  The last three weeks were spent refining my design, simplifying as much as possible, ensuring that the design was elegant, and not just workable.  This required redoing some of the diagrams. I would stop working for a day or two, and then review my design from top to bottom, making changes as needed.  The more iterations, the less I was changing, until in week seven I felt comfortable with the finished product.  I submitted my assignment and signed up for the essay the very next Saturday.
As a rough estimate, I would say I spent  around 150 hours total preparing the assignment.  I could have done it in less time if had not done a prototype, and if I didn't have to try several new UML tools.
For my solution the sample shown in the Cade and Sheil book was main resource, and I can recommend it as a good concise resource.  Even though the book is targeted at SCEA 5 (OCMJEA 5), it's worth nothing that the assignment is the same  for OCMJEA 5 & 6.
I also bought the training tool from EPractizeLabs SCEA 5 Part 2 and 3 Certification Training Lab. In my particular case this tool wasn't very valuable, primarily because I bought it once I had done most of the work, so it just helped me verify that there wasn't anything else for me to do. This training lab provides more sample solutions than the single one presented in the Cade and Sheil book, but it becomes evident that in any solution you're always covering the same aspects.
I finished my certification before the " OCM Java EE 6 Enterprise Architect Exam Guide" by Allen and Bambara was available, so I do not have a comment on how useful their material is.

Looking back, my tips and recommendations


  • Read and read and read the assignment until have three things clear:
    • What your application needs to do: the functional requirements.
    • How your application should operate.  These are the Non Functional Requirements (NFR), and includes aspects such as performance, security, availability, etc.
    • What systems you have to integrate with, and how you can integrate with them.  This includes what protocol to use, async vs. sync integration, etc.
  • Ensure that you implement the business object model as described in the assignment.  You can augment it, but do not change it.  If it doesn't make sense, read it again until it does.  If it still doesn't make sense, add assumptions so that it does make sense.  
  • As you're designing the solution keep a list of risks and assumptions.  This will make your life much easier later on.  I did not do this so I spent a considerable amount of time going back and forth and trying to remember some of the justifications I had though about
  • Keep in mind all of your NFR, and make sure you address them in your design and your assumption.  Even if you think something is obvious, write it down.  You're the architect, so everything is either something you have to design, or something you assume is already in place.  Either way, document it.  I'm talking about things like network connections, databases, external systems, clients, etc.  The NFR normally taken into account are performance, scalability, reliability, availability, maintainability, extensibility, manageability, and security.  If you need to refresh some of these concepts you can take a look at my notes for the part 1 exam.  
  • If something doesn't feel right, don't be afraid to change it.  I redid my diagrams several times.  Some changes were very significant, for example changing from one technology framework to another.  Other changes were minor, such as polishing naming conventions to make it easier for the instructor to understand what I was doing.  The biggest change I did was to convert most of my business logic from Stateless Session Beans to CDI Managed Beans, since EJB provided no useful benefit to solving the problem at hand. I did keep some Message Driven Beans (MDB) and Singleton Session Beans that had specific requirements. 
  • When I do an assignment I normally try to do what's required, nothing more, nothing less.  In this case in particular I did do a few extra diagrams to explain some of the trickier elements that were not evident in the required diagrams.  This included a diagram of the JMS queues, a package diagram to make it easier to understand my class diagram, and an activity diagram detailing how the chosen platform would support one the NFR.  Of course this is dependent on your solution, but I feel some extra clarification can be helpful.
  • Don't be afraid to be specific.  I chose a specific Application Server (Weblogic in my case), and I justified it since it had particular features to help me meet the particular NFR of my assignment.  The same applies to the other aspects of the deployment, server specs, OS specs, database specs, security and firewalls, physical server security, application management.  Remember, you're the architect, so every detail in ensuring a successful solution is part of your job.   

The essay and the wait...

The essay part has a duration of 120 minutes, and be prepared to use all of the time.  I'm sure I could have kept going for at least a couple more hours.  If you did the assignment correctly, and addressed all of the functional and non functional requirements, you should have more than enough to fill two hours of writing.  
Be ready to justify your choice of technologies and architectures, specially compared to other technologies that could have been used in those cases.  This will show that you have a well rounded knowledge of the Java ecosystem, and can make an informed decision between all of the different frameworks out there.  This includes technologies such as persistence mechanisms (JPA, Hibernate, JDBC, NoSQL) and web frameworks (JSF, Spring MVC, Struts, etc.).  Do you need a full blown EAR vs a simple WAR?
In this part I took special care to justify what I thought was a very controversial part of my design.  I will not go into details, suffice to say that I did not have one of the pieces that is almost always present in a modern web application.  I had already justified this in my assignment, but I went the extra mile in the essay and described how I would have done it in the "traditional way" if my assumptions were not applicable.  I also explained all of the potential downsides of the "traditional way".
The grading took almost three (nerve-wrecking) weeks, but I've read of greatly varying times.  I passed with 147 out of 160 possible points, which makes me feel confident of my process.  Unfortunately the score report does not shed any light on what I could have done better.  Only time will tell how valuable this certification will be for me, but I can at least say that the learning process helped me to structure many of the activities I have already been doing, and solidified some of my weaker areas.  
If you have any questions, feel free to ask. 
And if you're on your way to become an OCM, best of lucks!


Monday, June 30, 2014

Passing the Java EE 6 Enterprise Architect Certified Master Part 1 (Exam 1Z0-807)

Last Saturday I passed the 1Z0-807 test, and I wanted to share some of my experience, specially since there seems to be little information about this test (compared to other Java certification tests at least). You can also take a look at my study notes.  You can see the my notes for part 2 & 3 here.

My total time to prepare was around 6 weeks. It was a slow time at the office, so I think I was doing around 15-20 hours of reading / studying per week.

Going into the studying phase I felt I was very weak in the EJB and JSF parts of the material, since it's not something that I actively use at work, while on the other technologies I felt I had a moderate to strong grasp on the material.

I think 6 weeks was more than enough time to prepare if you have a background working with database driven Java web applications (even if not using the full Java EE stack as in my case).  Your pace may vary, and honestly I signed up for the test before I had started studying, so the time constraint was my motivation.

Books that I read to prepare for this test:

  • "The Java EE 6 Tutorial" by Eric Jendrock et al. (you can get it here) 
  • "Real World Java EE Pattern" by Adam Bien (the second edition) 
  • "Sun Certified Enterprise Architect for Java EE Study Guid" by Mark Cade and Humphrey Sheil 
  • "Bitter Java" and "Bitter EJB" by Bruce Tate 
  • "SOA in Practice" by Nicolai Josuttis
 Books that I had read in the past that helped:

  • "Design Patterns: Elements of Reusable Object-Oriented Software" Erich Gamma,Richard Helm,Ralph Johnson,John Vlissides 
  • "Enterprise Integration Patterns" by Gregor Hohpe 

The biggest issue I had was the lack of a proper study guide for this test.  The study guides I found were for the previous version of the test, based on Java EE 5, however most of the material is relevant.  I found the Java EE 6 tutorial very useful to make sure I figured what were the gaps that I needed to fill.  An specific guide for this test is supposed to be available very soon, so you might have better luck than I did.  If and when it becomes available, by all means read it to guide yourself.

In general I recommend getting through the material as described by the outline once, and then practicing and practicing some more.  Get as many practice questions as you can.  Some of those questions have subjective answers, but the more you practice the better chance you will have. Currently the only test simulator is from EPracticeLabs, and while not awesome I think is more than enough to make it through.

Relevant things that I found are not directly mentioned in the outline but are significant in the exam:

  • Design patterns and anti-patterns (covered by the books listed above)
  • Security (specially risks and how to mitigate them)
  • When to use a technology. For example when to use EJB or just a web container.  When to use DAOs, JDBC, or JPA.  When to use durable subscribers in JMS.  For this I would recommend you practice until you can detect the hints that the give in the questions regarding portability, scalability, etc.
Regarding the exam itself I can point out:

  • The exam was what I expected based on the practice questions I had seen. No surprise here.
  • There were many scenario questions with incomplete information.  So it get's down to eliminating obvious wrong answers and then some luck picking from what's left.
  • Only multiple choice questions (pick one, or pick X).  No drag and drop or anything like that.
  • Time is plentiful.  The give you 150 minutes (two and a half hours).  I'm fast at taking tests, but it took me thirty minutes to do my first pass, and probably ten minutes to review.
  • Some questions can get ambiguous if you over think them.  For example, one-tier is a mainframe application, two-tier is thick client, three tier is web based application.  Don't over think about a contrived three tier application with thick clients talking and sharing business logic with EJBs unless specifically told so on the questions.
  • Finally, they didn't give me result right away.  They said I would get an email in 30 minutes with the result, but it arrived in a matter of five minutes or so after finishing the test.  I haven't taken an Oracle test in more than 3 years, but I don't remember this being the case.  


You can take a look my study notes below.  They do borrow material from some Java EE 5 notes that are floating around in the internet:
  • http://java.boot.by/scea5-guide/
  • http://rieck.dyndns.org/architecture/scea5.html


Here's the direct link to the document.

If you have any questions, feel free to add a comment and I'll try to help you.

You can now see the my notes for part 2 & 3 here.

Monday, February 17, 2014

Measuring coverage for Unit and Integration tests with Maven, Jenkins, and SonarQube

Measuring coverage for Unit and Integration tests with Maven, Jenkins, and SonarQube. This blog post provides a very simple example of integrating Maven, Jenkins, and SonarQube, in particular to properly get coverage metrics of integration tests. While the basic integration Maven, Jenkins, and SonarQube was really simple (including code coverage metrics during unit tests, getting the integration data to display in Sonar was more complicated, and required me to piece together this configuration from several posts around the internet.

These tools are very easy to install, and provide the basic framework for serious quality development. Hopefully you will find this information useful.

This tutorial assumes that you have installed and setup the following tools:

  • Maven A Java build management system.
  • Jenkins A continuous integration (CI) system
  • SonarQube A software quality mangement system.   
If you want some pointers on getting these tools setup, you can find plenty of resources in the web:


Project setup 

We will start looking at the pom.xml, which is most critical part of this tutorial. If you're familiar with Jenkins a and Sonar, the rest of this tutorial might be redudant for you.
pom.xml
<project xmlns="http://maven.apache.org/POM/4.0.0" xmlns:xsi="http://www.w3.org/2001/XMLSchema-instance"
         xsi:schemaLocation="http://maven.apache.org/POM/4.0.0 http://maven.apache.org/maven-v4_0_0.xsd">
    <modelVersion>4.0.0</modelVersion>
    <groupId>test.tutorials.multi</groupId>
    <artifactId>mod2</artifactId>
    <packaging>jar</packaging>
    <version>1.0-SNAPSHOT</version>
    <name>Coverage Maven Application</name>


    <properties>
        <sonar.jacoco.itReportPath>${env.WORKSPACE}/target/jacoco-integration.exec</sonar.jacoco.itReportPath> <!-- 1 -->
    </properties>

    <build>
        <plugins>


            <plugin>
                <groupId>org.jacoco</groupId>
                <artifactId>jacoco-maven-plugin</artifactId>
                <configuration>
                    <propertyName>jacoco.agent.argLine</propertyName> <!-- 2 -->
                    <destFile>${project.build.directory}/jacoco-integration.exec</destFile> 
                    <dataFile>${project.build.directory}/jacoco-integration.exec</dataFile> <!-- 3 -->
                </configuration>
                <executions>
                    <execution>
                        <id>agent</id>
                        <goals>
                            <goal>prepare-agent</goal> <!-- 4 -->
                        </goals>
                    </execution>
                </executions>
            </plugin>

            <plugin>
                <artifactId>maven-failsafe-plugin</artifactId>
                <version>2.6</version>
                <configuration>
                    <argLine>${jacoco.agent.argLine}</argLine> <!-- 5 -->
                    <reportsDirectory>${project.build.directory}/surefire-reports</reportsDirectory> <!-- 6 -->                 
                </configuration>
                <executions>
                    <execution>
                        <goals>
                            <goal>integration-test</goal> 
                            <goal>verify</goal> <!-- 7 -->
                        </goals>
                    </execution>
                </executions>
            </plugin>           

        </plugins>
    </build>


    <dependencies>
        <dependency>
            <groupId>junit</groupId>
            <artifactId>junit</artifactId>
            <version>4.11</version>
            <scope>test</scope>
        </dependency>

    </dependencies>

</project>
  1. This property lets sonar know where to find JaCoCo reports for the integration tests. The ${env.WORKSPACE} prefix enables the Sonar plugin to find these files.
  2. The JVM argument required to inject JaCoCo into the integration tests with be stored in a property named jacoco.agent.argLine .
  3. The destFile and dataFile properties indicate where JaCoCo will output its files.
  4. The
    prepare-agent
    goal will setup the JVM argument that we will reuse later.
  5. Property will inject the required JVM arguments to enable JaCoCo integration. Since JaCoCo does instrumentation at runtime, building and injecting the proper parameters is all that's required to get coverage information.
  6. Changing the reportsDirectory property is optional, and will cause the Failsafe plugin to output it's results to the same directory used by the Surefire plugin. The Surefire plugin executes Unit Tests in Maven, and it's results are read by SonarQube, and displayed as "Unit test success". Sending Failsafe's results to the Surefire report directory will trick Sonar into display the information. If you have a CI server such as Jenkins displaying this information, this "trick" might be superfluous.
  7. The Failsafe plugin will run in the integration-test and verify goals.

Other than the pom.xml, the test project includes to very basic tests, a unit test, and an integration test. Each one covers 50% of the classes in the projects.  You can get the complete source code here. You will find a minimal example from which you can work up.

Setting up a job with Sonar support in Jenkins

There's several ways of running SonarQube against a project:
  • Using the SonarQube plugin for Jenkins
  • Using the stand alone SonarQube Runner
  • Adding it to your Maven (or Ant) build
In this tutorial we will use the first option.  Personally I prefer to keep the pom as clean as possible, and have Jenkins perform extra steps such as analyzing code quality, deployment into package managers, etc.

Make sure that you install the Jenkins SonarQube plugin:


The SonarQube plugin must be configured with one or Sonar installation.  Most shops will only have one Sonar installation.  This can be done in "Manage Jenkins" -> "Configure System"


In this case, we're using the defaults, since our SonarQube installation is running on http://localhost:9000, and we're using the embedded database, so there's no need to configure any of the database information.

It is also useful to check "Skip if triggered by SCM Changes" and "Skip if triggered by the build of a dependency", to prevent Sonar running after every commit.  Running Sonar once a night is normally enough for most projects.  This assumes that you have one nightly build scheduled for every project that you want to analyze with SonarQube.

We will then set up a simple Maven job in Jenkins:


We will check this project out of Source Control Management.  I'm going to use SVN to access a directory inside my git repository.  For real projects, I would recommend having a one git repository per each project:


Finally, we just add a "Post-build Action", to invoke SonarQube.  This will use the configuration for the SonarQube instance we configured before.


Finally you can start a build manually.  This will cause to project to first be built as usual using Maven, and the analyzed by Sonar:


The results

After the build is run successfully by Jenkins, you can see the results on your SonarQube installation.  Make sure that you have the "Integration Tests Coverage" widget in your dashboard.  To add it, log into SonarQube, and click on "Configure widgets".


You can see how Test Coverage for Integration Tests is reported separately, and that there's a metric for "Overall Coverage", which joins the coverage for unit tests and integration tests.  If you drill down can see much more detail about your project, so I encourage to click around and see what Sonar has to say about your code.

Source Code

As always the code is available for you to download and play with. Clone it from it from github:
git clone https://github.com/aolarte/tutorials.git
The finished code is contained in directory coverage.

References


Wednesday, October 9, 2013

Simple Spring and JPA with Hibernate tutorial. Part 3: Simple Security

Spring security In this blog post we continue adding functionality to our Spring and JPA application. We will be adding basic security using Spring Security (formerly known as Acegi Security). However to achieve this we'll also look at some new elements:
  • Spring's ContextLoaderListener and hierarchical contexts
  • Entity relationships in JPA
  • Multiple Spring xml files and their organization
  • Maven's quirks with transitive dependencies
This example builds on top of the code that was written for part 2, but we will rearrange several pieces. Let's start by looking at the pom.xml where we've added two new dependecies:
pom.xml
<project xmlns="http://maven.apache.org/POM/4.0.0" xmlns:xsi="http://www.w3.org/2001/XMLSchema-instance"
         xsi:schemaLocation="http://maven.apache.org/POM/4.0.0 http://maven.apache.org/maven-v4_0_0.xsd">
    <modelVersion>4.0.0</modelVersion>
    <groupId>test.tutorials</groupId>
    <artifactId>spring-hib-jpa</artifactId>
    <packaging>war</packaging>
    <version>1.0-SNAPSHOT</version>
    <name>spring-hib-jpa Maven Webapp</name>


    <properties>
        <springVersion>3.2.4.RELEASE</springVersion>
        <springSecurityVersion>3.1.4.RELEASE</springSecurityVersion> <!-- 1 -->
    </properties>

    <dependencies>


        <dependency>
            <groupId>org.springframework</groupId>
            <artifactId>spring-beans</artifactId>
            <version>${springVersion}</version>
        </dependency>

        <dependency>
            <groupId>org.springframework</groupId>
            <artifactId>spring-webmvc</artifactId>
            <version>${springVersion}</version>
        </dependency>

        <dependency>
            <groupId>org.springframework</groupId>
            <artifactId>spring-orm</artifactId>
            <version>${springVersion}</version>
        </dependency>

        <dependency> <!-- 2 -->
             <groupId>org.springframework.security</groupId>
             <artifactId>spring-security-core</artifactId>
             <version>${springSecurityVersion}</version>
        </dependency>

        <dependency>
             <groupId>org.springframework.security</groupId>
             <artifactId>spring-security-config</artifactId>
             <version>${springSecurityVersion}</version>
        </dependency>

        <dependency>
            <groupId>org.springframework.security</groupId>
            <artifactId>spring-security-web</artifactId>
            <version>${springSecurityVersion}</version>
        </dependency>


        <dependency> <!-- 3 -->
            <groupId>org.springframework</groupId>
            <artifactId>spring-aop</artifactId>
            <version>${springVersion}</version>
        </dependency>


        <dependency>
            <groupId>org.hibernate</groupId>
            <artifactId>hibernate-entitymanager</artifactId>
            <version>4.1.9.Final</version>
        </dependency>

        <dependency>
            <groupId>jstl</groupId>
            <artifactId>jstl</artifactId>
            <version>1.2</version>
        </dependency>

        <dependency>
            <groupId>com.h2database</groupId>
            <artifactId>h2</artifactId>
            <version>1.3.161</version>
        </dependency>


        <dependency>
            <groupId>org.apache.tomcat</groupId>
            <artifactId>tomcat-dbcp</artifactId>
            <version>7.0.41</version>
        </dependency>

    </dependencies>
</project>
  1. We add a property for the Spring Security version, just like we did for Spring. In version 3, Spring and Spring Security have different release schedules and versions. Both projects should have their versions synchronized by version 4.
  2. We add 3 Spring Security dependencies:
  3. "spring-security-core" provides the basic classes used by the framework
  4. "spring-security-config" provides the elements needed to configure the framework, for example the xsd files used in the xml configuration.
  5. "spring-security-web" provides the hooks to provide URL based security.
  6. Spring security requires the "spring-aop" dependency. However, since the Spring and Spring Security versions are not in sync, it depends on a version of "spring-aop" that is incompatible with Spring 3.2.4 (the one we're using). To solve this, we add an explicit dependency to the right version. When a project depends on two different versions of the same library, Maven will pick the one closer to the root. What we have done is declared the dependency at the very root of the project, to ensure our version is used. Luckily our version of "spring-aop" is compatible with the Spring Security version we're using.
Now let's look the at the web.xml, where we have a few new elements:
src/main/webapp/WEB-INF/web.xml
<web-app xmlns="http://java.sun.com/xml/ns/javaee" version="2.5">

    <listener>
         <listener-class>org.springframework.web.context.ContextLoaderListener</listener-class> <!-- 1 -->
     </listener>

    <context-param>
        <param-name>contextConfigLocation</param-name>  <!-- 2 -->
        <param-value>WEB-INF/spring-context.xml</param-value>
    </context-param> 

    <filter>
        <filter-name>springSecurityFilterChain</filter-name>
        <filter-class>org.springframework.web.filter.DelegatingFilterProxy</filter-class>   <!-- 3 -->
    </filter>

    <filter-mapping>
        <filter-name>springSecurityFilterChain</filter-name>   <!-- 4 -->
        <url-pattern>/*</url-pattern>
    </filter-mapping>

    <servlet>
      <servlet-name>spring</servlet-name>
      <servlet-class>org.springframework.web.servlet.DispatcherServlet</servlet-class>
      <load-on-startup>1</load-on-startup>
    </servlet>
   
    <servlet-mapping>
        <servlet-name>spring</servlet-name>
        <url-pattern>*.html</url-pattern>
    </servlet-mapping>

</web-app>
  1. In this new application we introduce another way of configuring the Spring container, through a listener. The listener will create a parent context. We will also create a child context, instantiated by the DispatcherServlet. The child context will have access to the beans of the parent context, but not the other way around.
  2. The location of the xml file to instantiate the parent context is defined with a context parameter named "contextConfigLocation". We will look at this file in detail. In this parameter you can configure more than one file, but for now
  3. To actually secure the application, we add a new filter. In the spring world, the MVC framework and the security framework are separate mechanisms.
  4. The security filter is normally applied to the whole application, with a mapping of "/*". We can later tune this apply rules to only some URLs.
Let's start looking at the spring-context.xml, where we configure the parent spring context:
src/main/webapp/WEB-INF/spring-context.xml
<?xml version="1.0" encoding="UTF-8"?>
<beans xmlns="http://www.springframework.org/schema/beans"
       xmlns:xsi="http://www.w3.org/2001/XMLSchema-instance"
       xmlns:tx="http://www.springframework.org/schema/tx"
       xmlns:context="http://www.springframework.org/schema/context"
       xmlns:beans="http://www.springframework.org/schema/beans"
       xsi:schemaLocation="http://www.springframework.org/schema/beans
        http://www.springframework.org/schema/beans/spring-beans.xsd
        http://www.springframework.org/schema/context
        http://www.springframework.org/schema/context/spring-context.xsd
        http://www.springframework.org/schema/tx
        http://www.springframework.org/schema/tx/spring-tx.xsd
        ">

    <beans:import resource="spring-security.xml"/> <!-- 1 -->

    <context:component-scan base-package="test">
            <context:exclude-filter expression="org.springframework.stereotype.Controller" type="annotation"/>  <!-- 2 -->
    </context:component-scan>
   
    <tx:annotation-driven/> <!-- 3 -->

    <bean id="dataSource" class="org.apache.tomcat.dbcp.dbcp.BasicDataSource">
        <property name="driverClassName" value="org.h2.Driver"/>
        <property name="url" value="jdbc:h2:mem:test"/>
    </bean>


    <bean id="entityManagerFactory"
          class="org.springframework.orm.jpa.LocalContainerEntityManagerFactoryBean">
        <property name="dataSource" ref="dataSource"/>
        <property name="packagesToScan" value="test.model"/>
        <property name="jpaVendorAdapter">
            <bean class="org.springframework.orm.jpa.vendor.HibernateJpaVendorAdapter">
            </bean>
        </property>
        <property name="jpaProperties">
            <props>
                <prop key="hibernate.show_sql">true</prop>
                <prop key="hibernate.dialect">org.hibernate.dialect.H2Dialect</prop>
                <prop key="hibernate.hbm2ddl.auto">create-drop</prop>
            </props>
        </property>
    </bean>

    <bean id="transactionManager" class="org.springframework.orm.jpa.JpaTransactionManager"/>

</beans>
  1. In Spring, it is good practice to separate configuration files based on their purpose. Back in the day before annotations, these files could grow enormously. Nowadays they're shorter, but it still helps to keep them separate. The import element will include the contexts of another file, and the corresponding beans will be created in the current context. We will examine the spring-security.xml file later on.
  2. We have copied the component-scan element into this new file. However we're excluding beans that have @Controller annotation. Those beans will be registered by the Spring MVC configuration file.
  3. We have moved all of the JPA configuration (from "tx:annotation-driven" to the end of the file) into the main Spring xml file. I could also be possible to create a new file to keep all database/JPA related bean configuration.

src/main/webapp/WEB-INF/spring-security.xml
<beans:beans xmlns="http://www.springframework.org/schema/security"
    xmlns:beans="http://www.springframework.org/schema/beans"
    xmlns:xsi="http://www.w3.org/2001/XMLSchema-instance"
    xsi:schemaLocation="http://www.springframework.org/schema/beans
        http://www.springframework.org/schema/beans/spring-beans.xsd
        http://www.springframework.org/schema/security
        http://www.springframework.org/schema/security/spring-security-3.1.xsd">

    <http use-expressions="true"> <!-- 1 -->
        <intercept-url pattern="/**" access="isAuthenticated()" />  <!-- 2 -->
        <form-login /> <!-- 3 -->
    </http>

    <authentication-manager> <!-- 4 -->
        <authentication-provider user-service-ref="userService" /> 
    </authentication-manager>
</beans:beans>
  1. The http element provides securing of URLs (Spring Security also allows securing Java methods, but we'll look at that in another post). Of notice here is the attribute use-expressions="true", which allows using Spring EL instead of simply listing allowed roles.
  2. We are securing a single URL, which covers the whole application, and allows access to any use that is successfully authenticated. Multiple urls can be added to fine tune access control, and will be evaluated in the order in which they are declared.
  3. The form-login element provides a basic form based authentication. You can later customized the login page to fit the style of your application. Spring Security provides other ways of authentication, including HTTP BasicAuthentication, and several Single Sign On schemes.
  4. The "authentication-manager" is the bean that will verify the user credentials as well as provide the authorities or roles a user has. We will look at our implementation of the user service later.
Finally, we look at (the now much shorter) spring-servlet.xml. We've removed all of the elements not related to Spring MVC.
src/main/webapp/WEB-INF/spring-context.xml
<?xml version="1.0" encoding="UTF-8"?>
<beans xmlns="http://www.springframework.org/schema/beans"
       xmlns:xsi="http://www.w3.org/2001/XMLSchema-instance"
       xmlns:context="http://www.springframework.org/schema/context"
       xmlns:mvc="http://www.springframework.org/schema/mvc"
       xsi:schemaLocation="http://www.springframework.org/schema/beans
        http://www.springframework.org/schema/beans/spring-beans.xsd
        http://www.springframework.org/schema/context
        http://www.springframework.org/schema/context/spring-context.xsd
        http://www.springframework.org/schema/mvc
        http://www.springframework.org/schema/mvc/spring-mvc.xsd
        ">

    <context:component-scan base-package="test">
        <context:include-filter expression="org.springframework.stereotype.Controller" type="annotation"/> <!-- 1 -->
    </context:component-scan>
    <mvc:annotation-driven/>


    <bean id="viewResolver" class="org.springframework.web.servlet.view.InternalResourceViewResolver">
        <property name="prefix" value="/WEB-INF/jsp/"/>
        <property name="suffix" value=".jsp"/>
    </bean>


</beans> 
  1. Of note in this file is the "context:include-filter" which will only load controllers. Remember that this file is loaded as a subcontext, contrary to the spring-security.xml which is loaded in the main or parent context.
We have also two new entities, Role and Employee. We'll look a employee first
src/main/java/test/model/Role.java
@Entity
public class Role {

    @Id
    private Long id;
    private String name;

    // Getters and setters removed for brevity
}

This is a very basic entity, almost the same as the Person entity we had created in the first part. The most significant difference is that we're missing the @GeneratedValue annotation in the id field. This means that if we want to insert new roles, we need to manually specify an id.

Next we'll look at the Employee entity:


src/main/java/test/model/Employee.java
@Entity
public class Employee {

  @Id
  @GeneratedValue
  private Long id;
  private String userName;
  private String password;
  @ManyToMany
  
  private List<Role> roles;
  // Getters and setters removed for brevity
}

This is also a very basic entity, except for the addition of a collection field. The "roles" field will contain a list of roles assigned to the employee. This is indicated with the @ManyToMany annotation. In order to map the many-to-many relationship (many employees map to many roles), we need a join table. In this case the default join table will be called "Employee_Role", and it will have two columns "Employee_id" and "roles_id". The default can be changed by adding the @JoinTable annotation, which allows us to define the table name, as well as the column names.

After seeing the new entities, we can get a better idea of how they will look by looking at the data we're inserting into the database:


src/main/resources/import.sql
INSERT INTO PERSON (firstName,lastName) VALUES ('Joe','Doe') ;
INSERT INTO ROLE (id,name) VALUES (1,'ROLE_USER');
INSERT INTO ROLE (id,name) VALUES (2,'ROLE_ADMIN');
INSERT INTO EMPLOYEE ( userName, password) VALUES ('user','lion');
INSERT INTO EMPLOYEE ( userName, password) VALUES ('admin','tiger');
INSERT INTO Employee_Role (Employee_id , roles_id) VALUES ((SELECT id FROM EMPLOYEE WHERE userName='user'),1);
INSERT INTO Employee_Role (Employee_id , roles_id) VALUES ((SELECT id FROM EMPLOYEE WHERE userName='admin'),1);
INSERT INTO Employee_Role (Employee_id , roles_id) VALUES ((SELECT id FROM EMPLOYEE WHERE userName='admin'),2);

In this file we're now also inserting two employees, and the corresponding roles for each employee. Since the id of the employee is not know (we could assume they would be 1 and 2, but there's no guarantee), we use a SELECT to find the correct Id.

Now let's look at the employee service and DAO. This is the only part that requires some significant Java code. Everything else has been XML and some annotations in a POJO. This shows how much coding you're saving by using such a framework. Let's look at the EmployeeDAO first:


src/main/java/test/dao/impl/EmployeeDAO.java
@Repository
public class EmployeeDAO implements IEmployeeDAO {

    @PersistenceContext
    private EntityManager em;

    @Override
    public Employee findByUserName(String userName) {
        TypedQuery<Employee> query=em.createQuery("SELECT e FROM Employee e WHERE e.userName=:userName", Employee.class); //1
        query.setParameter("userName",userName); //2
        return query.getSingleResult(); //3
    }
}
  1. This class has only one method. In this method we're using the TypedQuery, which allows our query results to already have the correct type, and save us some potentially dangerous type casting.
  2. In this query we're using a parameter with a named placeholder ":userName". We then pass the user name we're looking for with the method setParameter.
  3. The getSingleResult method will return a single Employee. If no employee is found, a runtime exception of NoResultException type will be thrown.

Finally, we look a the user service:


src/main/java/test/service/impl/UserService.java
@Service
@Transactional
public class UserService implements UserDetailsService {

    @Autowired
    private IEmployeeDAO userDAO;


    public UserDetails loadUserByUsername(String userName) throws UsernameNotFoundException {
        Employee employee =userDAO.findByUserName(userName); // 2
        if (employee ==null) {
            throw new UsernameNotFoundException("Invalid Employee"); // 3
        }


        return createUserDetails(employee); // 4
    }

    private UserDetails createUserDetails(Employee employee) {
        List<GrantedAuthority> authorities=new ArrayList<GrantedAuthority>();
        for (Role role:employee.getRoles()) {
            authorities.add(new SimpleGrantedAuthority(role.getName())); // 5
        }
        User ret=new User(employee.getUserName(),employee.getPassword(),true,true,true,true,authorities); // 6
        return ret;
    }
}
  1. The UserService implements the Spring Security interface UserDetailsService. At this point it does not implement any our interfaces, but eventually will, once we add extra functionality that requires finding users.
  2. The employee is found using our DAO.
  3. If the employee is not found, a Spring Security exception of type UsernameNotFoundException is thrown. In this section we could also catch the RuntimeExceptions coming from the DAO, in order to manipulate the errors displayed by Spring Security. If we don't, Spring Security would display the message of the excpetion, which might not be the most user friendly message (for example "No entity found for query" when user is not found).
  4. The actual return value of the method is loadUserByUsername is a Spring Security interface, UserDetails. We use a private method to create the right type of object from the Employee object.
  5. In our private method, each Role object becomes a SimpleGrantedAuthority, another Spring Security object.
  6. Finally we create a User object, based on the information found in the Employee object and the list of GrantedAuthority.
We can then compile and run our small application with:

mvn tomcat:run

You can try to run the service but will be greeted with a login screen: http://localhost:8080/spring-hib-jpa/view.html :


You can then try to enter a username an password, and unless it matches what we inserted in database, you'll get an error:

If you enter a valid username and password you will see main screen of our little test application:

This is a very basic example, but we've set up security on our application.  And while there was plenty of XML configuration, there were no code changes.  This separation of business logic and security logic should allow for a better and easier to maintain application.

Source Code

As always the code is available for you to downloand and play with. Clone it from it from github:

git clone https://github.com/aolarte/tutorials.git
The finished code is contained in directory spring3_simple_security.

Simple Spring and JPA with Hibernate tutorial series:

Thursday, October 3, 2013

Simple Spring and JPA with Hibernate tutorial. Part 2: Forms and persisting entities

Continuing from the very basic spring example we did last week, we'll add some more features to demonstrate some more basic JPA and Spring functionality:
  • Spring forms
  • Spring model attributes
  • Persisting and merging entities in JPA
At the end of the post you can see instructions on how to get the source code. Since we're building up from the previous example, we'll only go over the parts that have changed: We start by looking at the Person DAO, in which we added two methods, one to persist person objects, and another to query a person, based on the id. The corresponding interfaces for the DAO and service classes have also been updated with the new methods.
@Repository
public class PersonDAO  implements IPersonDAO {

    @PersistenceContext
    private EntityManager em;

    @Override
    public List<Person> findAll() {
        Query query = em.createQuery("SELECT e FROM Person e");
        return (List<Person>) query.getResultList();
    }

    public void persist(Person person) {        
        em.merge(person); //1
    }

    public Person findById(Long id) {
        return em.find(Person.class,id); //2
    }
}
  1. The merge method persists the state of the object. If the object doesn't exist (if it has no id, or an object with the passed in id does not exist in the database) a row in the database will be created.
  2. The find methods allows to find a entity of a particular class, based on the id. This could also be achieved using an JPQL query.
In the person service class, we simply added two delegate methods to the DAO.
@Service
@Transactional
public class PersonService implements IPersonService{

    @Autowired
    private IPersonDAO personDAO;

    @Override
    public List<Person> findAll() {
        return personDAO.findAll();
    }

    @Override
    public Person findById(Long id) {
        return personDAO.findById(id); 
    }

    @Override
    public void persist(Person person) {
        personDAO.persist(person); 
    }
}
Now we look at the controller, in which we added several three methods that handle requests. One to display the UI to edit an existing record, one to display the UI to enter a new record, and one we we post the modified or new entry.
@Controller
public class TestController {

    @Autowired
    private IPersonService personService;

    @RequestMapping(value="/view",method = RequestMethod.GET)
    public ModelAndView view() {
        ModelAndView ret=new ModelAndView("view");
        List<Person> persons=personService.findAll();
        ret.addObject("persons",persons);
        return ret;
    }

    @RequestMapping(value="/view/{id}",method = RequestMethod.GET)  //1
    public ModelAndView viewById(@PathVariable Long id) { //2
        ModelAndView ret=new ModelAndView("person");
        Person person=personService.findById(id); //3
        ret.addObject("person",person);
        return ret;
    }

    @RequestMapping(value="/new",method = RequestMethod.GET)
    public ModelAndViewnewPerson(Person person) { //4
        ModelAndView ret=new ModelAndView("person");
        ret.addObject("person",person);
        return ret;
    }

    @RequestMapping(value="/post",method =  RequestMethod.POST)
    public ModelAndView post(Person person) { //5
        ModelAndView ret=new ModelAndView("view");
        personService.persist(person); //6
        List<Person> persons=personService.findAll();
        ret.addObject("persons",persons);
        return ret;

    }

}
  1. The first new method allows to view an edit a specific person, base on the person's id. A new notation is introduced here, to pass variables from the URL. In this case, variables surrounded by brackets (in this case {id}) are passed as variables annotated with @PathVariable. We also specify that this method will only be invoked for GET requests.
  2. By default, path variables are mapped based on name of the paramenter and the name in the url. A different name can be specified by changing the annotation @PathVariable("locationId").
  3. We utilize one of the new methods we created in the service classes to find the person given the id. We then pass that person to the model.
  4. The newPerson method declares a Person object in its signature. This is a model attribute. Since this attribute is not yet bound, and empty Person object will be passed. We pass this object to view.
  5. In the post method, we have a similar method signature with the Person object. In this case we do expect the object to be bound, since it's coming from a form which we'll see a bit later.
  6. We use the person service to persist the person object we received from the form, and then retrieve the list of all persons in the system.
To expose the new functionality, we have to make a few changes to the jsp we we using to display the persons:
<%@ taglib uri="http://java.sun.com/jsp/jstl/core" prefix="c" %> 
<html>
    <body>
        <table border="1">
            <tr>
                <th>First Name</th>
                <th>Last Name</th>
            </tr>


            <c:forEach items="${persons}" var="person">
                <tr>
                    <c:url var="personUrl" value="view/${person.id}.html"/>  <%-- 2 --%>
                    <td>
                        <a href="${personUrl}">
                            ${person.firstName}
                        </a>
                    </td>
                    <td>
                        <a href="${personUrl}">
                            ${person.lastName}
                        </a>
                    </td>
                </tr>
            </c:forEach>
        </table>
        <a href="new.html">Click here to add a new entry</a>  <%-- 3 --%>
    </body>
</html>
  1. We use the url tag to put together a url that includes the person id, and we store it in a variable named personUrl. Using the url tag is good practice since it takes into account the context of the application when creating urls. We then add the proper tags to link from each person.
  2. We add a simple link to a new page, that will enable us to create a new person record.
We also add a new jsp that allows us to edit and create new persons.
<%@ taglib uri="http://java.sun.com/jsp/jstl/core" prefix="c" %>
<%@ taglib uri="http://www.springframework.org/tags/form" prefix="form"%>  <%-- 1 --%>
<html>
    <body>

        <c:url var="postUrl" value="/post.html"/>  <%-- 2 --%>
        <form:form method="POST" commandName="person" action="${postUrl}">  <%-- 3 --%>
            <form:input path="firstName" />  <%-- 4 --%>
            <br/>
            <form:input path="lastName" />
            <br/>
            <form:input path="email" />
            <br/>
            <form:hidden path="id" />  <%-- 5 --%>
            <input type="submit" value="Submit">  <%-- 6 --%>
        </form:form>
    </body>
</html>
  1. We add another tag library, in this case the Spring form library which enables us to work with model attributes (in this case the Person object).
  2. We use the url tag to put together the url where we'll post our form.
  3. The "form:form" tag will render as a normal form html tag, but it takes a lot of the work of setting it up, if used within the scope of Spring MVC. Other than the standard "method" and "action" parameters, the tag takes a "commandName", which is the name of the model attribute that will be passed from the controller. It defaults to "command", but for this example we're specifying "person" to make it more readable.
  4. Tags such as "form:input" mimic standard HTML tags, but provide wiring to model attribute through the "path" attribute. In this case the field will be wired to the data of the field "fistName" in the person object.
  5. A hidden field ensures we send the id of the person object (in case we're editing an existing one). This will ensure we update the current record, and not create a new one.
  6. A plain submit HTML button is all that's needed to complete the form.
We can then compile and run our small application with:

mvn tomcat:run

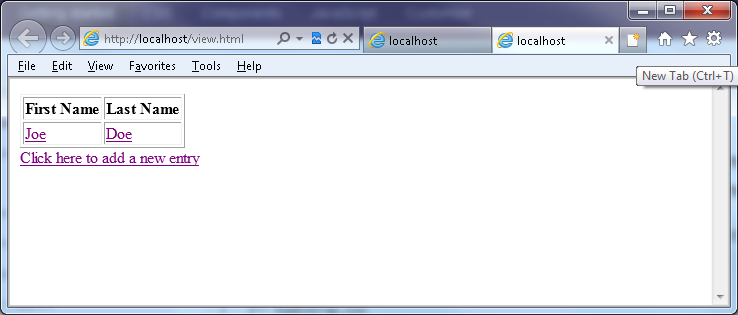
You can open a browser and see the the application running at http://localhost:8080/spring-hib-jpa/view.html:

You can also add new people by clicking "Click here to add a new entry":
And how they are persisted:

Source Code

You can clone the code and play with it from github:
git clone https://github.com/aolarte/tutorials.git
The finished code is contained in directory spring2_forms. If you want to start with the base code, use the directory spring1_basics.

Simple Spring and JPA with Hibernate tutorial series: